When I posted "Wireframing with Illustrator and InDesign", several people asked about my Illustrator techniques. The simple truth is that I've used Illustrator a lot over the past decade and have learned a quick key for virtually everything I produce, whether it's logos, wireframes, or full-fledged interface designs. If there aren't quick keys for some frequently performed task, I will often create my own.
If you're new to Illustrator, don't fret. I'm starting this post at the beginning, so even if your goal is not to get blazing fast, you'll still get a solid understanding of the basics.
RANDOM PRINT SHOP SOMEWHERE IN SOUTHEAST GEORGIA - DAY (2000)
"Black magic!" I thought to myself, as I witnessed for the first time, someone manipulating vector shapes in Adobe Illustrator. I was a freshman in college and visited a print shop to get a sticker made for the top of my white Ford Mustang's windshield. I'm embarrassed to admit that the sticker was designed to stretch across the entire width and read "Xtreme Customs." At least I didn't go for the "customz" spelling, but unfortunately this was the genius slogan that a group of friends and myself agreed upon as the name of our vehicle clique.
I designed the sticker in MS Paint like a total boss, but of course, the resolution was much too low to be stretched across the windshield of a vehicle. So the guy at the print shop scanned in my sad print out of what I thought was an incredible logotype and pulled it up in Illustrator. He began razzling and dazzling me with his fancy bézier curves and handlebar tweaking techniques. I didn't even know what type of software was capable of producing such awesomeness, let alone that I would one day use it for myself.
I remember the smell of all that fresh new plastic as he swiftly vectorized my bitmap printout and sent it to his giant plotter.
Today's Syllabus
- Understanding Vector Shapes
- Selection and Direct Selection Tools
- Drawing Rectangles and Circles
- Basic Bézier Curve Modification
- Real World Use Case - iPhone Sign Up Screen
Understanding Vector Shapes
Before we jump in too deep, you need to have a basic understanding of vector shapes, points, paths, and the tools used to manipulate them.
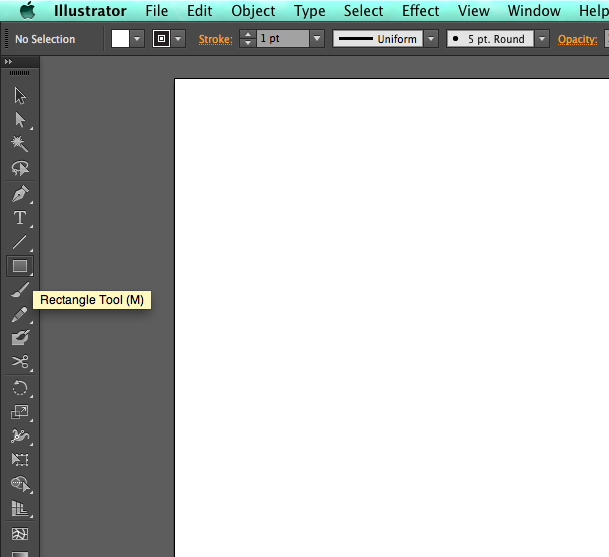
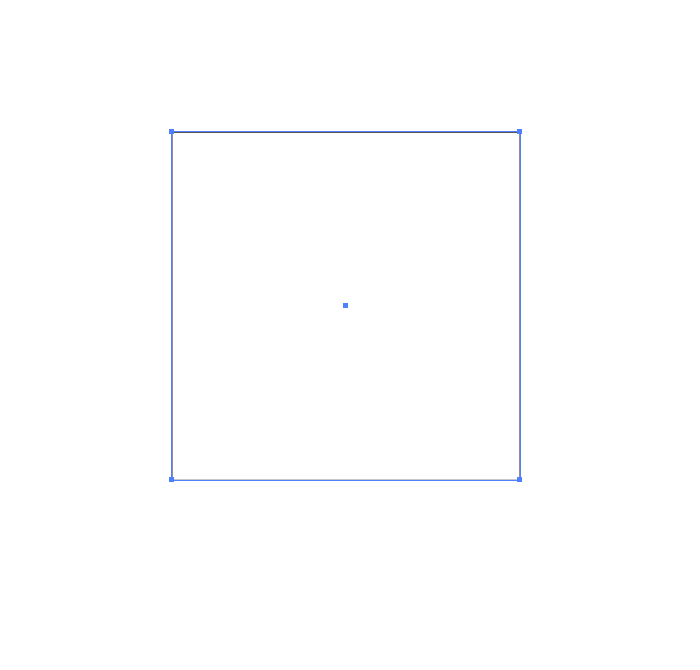
First, we're going to draw a square in Illustrator. To do this, hit the M key on your keyboard. This is the quick key for selecting the rectangle tool. If you're going to use Illustrator and want to get fast and furious with it, you must learn this quick key along with all of the others I subsequently mention. Don't you dare go clicking on that tool panel without trying to remember the quick key first.
Alright, now that the rectangle tool is selected with the M key, you have two options for drawing a rectangle.
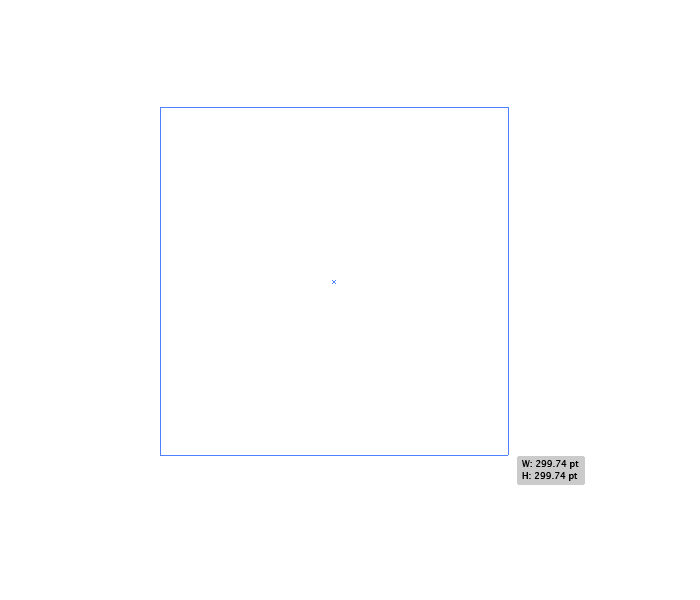
The first: Click and drag on the canvas while holding the shift key to maintain 1:1 proportions. Release your mouse button when you're happy with the size of your square.
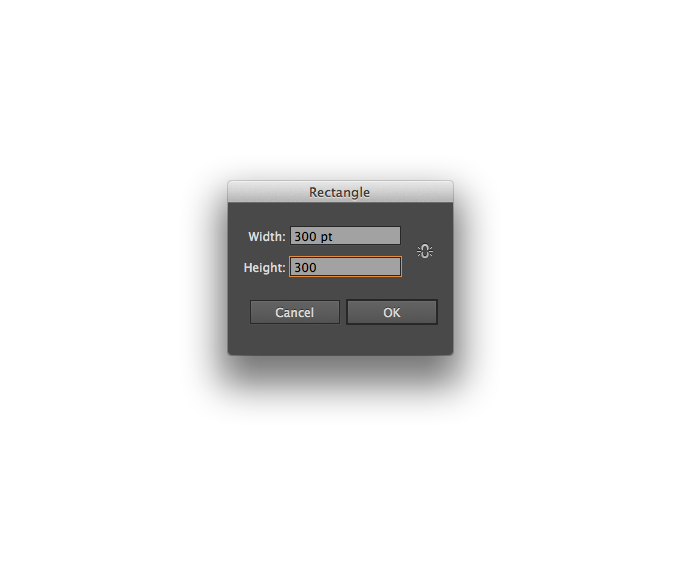
The second: Click once anywhere on the canvas. Don't drag. This will open a dialog box where you can enter dimensions for your shape. This is particularly helpful if you are creating buttons for an interface that have a common height. Enter 300 x 300 and watch your shape automatically appear.
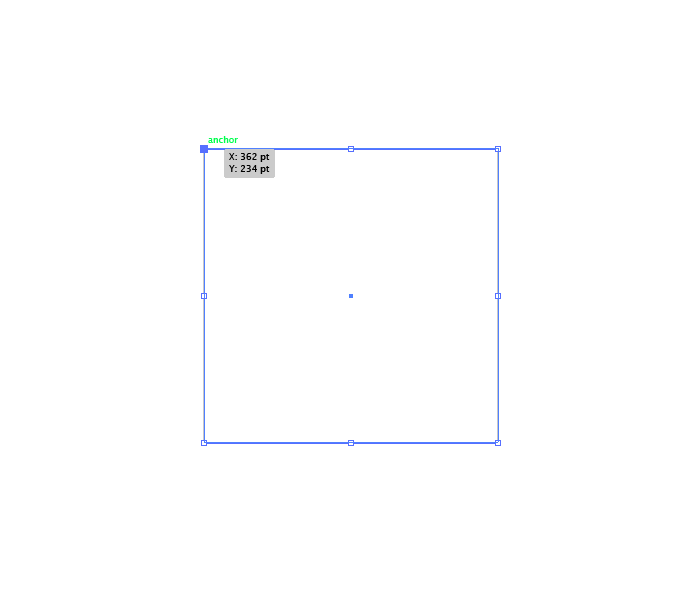
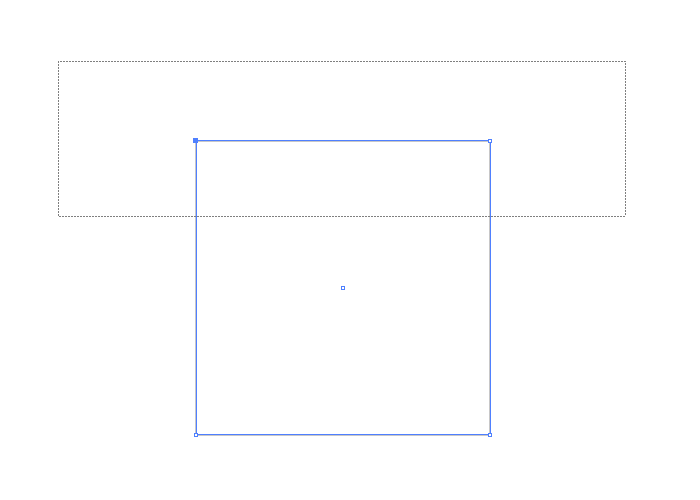
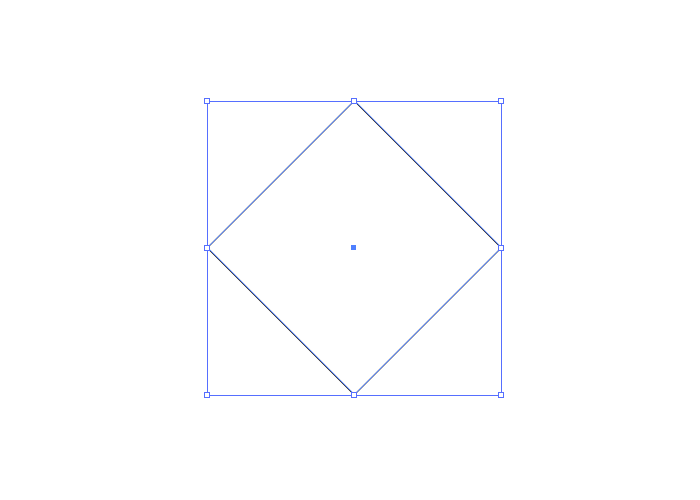
Now that the shape is drawn, let's analyze it a bit. Press the A key on your keyboard to select the Direct Selection tool. I'll cover this tool in a moment, but for now you can see that there are four blue squares in each corner of the shape with a tiny line connecting them all. The tiny blue squares are called anchors and the connecting lines are called paths.
Selection Tool
Once you've drawn the shape, you'll notice that the rectangle tool is still selected. Chances are high that you'll want to move that square somewhere, even if it's just a few pixels. Hit the V key on your keyboard to quickly change from the Rectangle Tool to the Selection Tool. This is not an optional shortcut for you to learn. You must use this quick key if you want to get fast with Illustrator.
The Selection Tool selects an entire vector object. Now that it's selected, you can move your square around a bit to get a feel for it.
Resizing
The selection tool can also be used to transform a shape's height and width. Move your mouse over the corner anchor point of the object's bounding box until your mouse cursor changes from the pointer to the expand icon. Hold shift to maintain proportions while scaling the shape. You can also hold option to scale the shape from the center as opposed to a corner.
If the bounding box isn't showing for you hit cmd+shift+B to show it. This is the same as choosing View > Show Bounding Box from the menu bar.
You can also hover the middle section of the bounding box to stretch a shape in one direction.
As a general rule, I only use the Selection Tool to stretch large simple shapes like rectangles, circles, etc. When you get further into more intricate design the Direction Selection Tool is most often preferable.
Changing the Color
In the bottom of the tool panel you'll see a fill and stroke color swatch. The fill is on the left and the stroke is on the right. Fill refers to the solid color of the shape, whereas stroke refers to the line around the shape.
Any shape you create can have both a fill and stroke, one or the other, or neither. With the rectangle selected you can click the small arrow to reverse the fill and stroke, choose additional colors, etc.

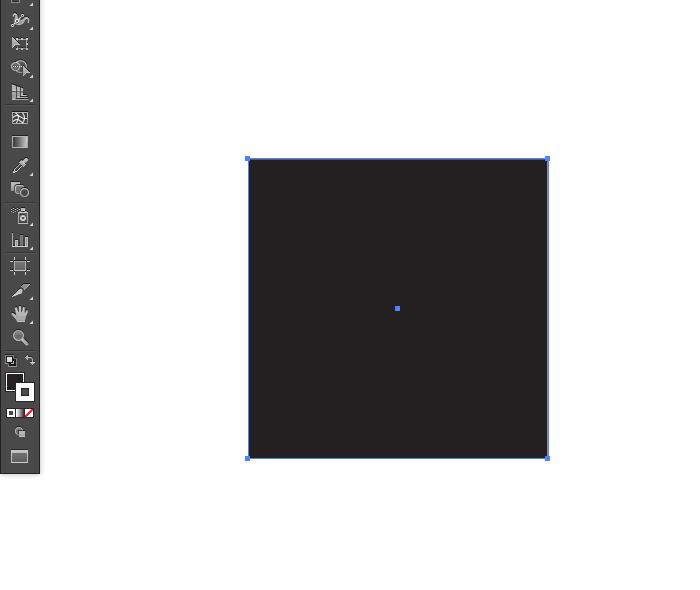
All vector shapes, including text, in Illustrator have fill and stroke properties.
Direct Selection Tool
The Direct Selection Tool selects an individual element of a vector object. This allows you to isolate an anchor point and manipulate it separate from the others. The quick key for Direct Selection is A and yes, you must learn and use this quick key.
Pro Tip: Hover your mouse over any of the tools to see the quick key for that specific tool. For example,
Direct Selection (A)will appear when you hover theDirect Selectiontool in the tool panel.
You can select anchor points in a shape by clicking on them directly or drawing a faux shape around them, much like you would move folders around on your desktop.
The direct selection tool will change slightly when you hover directly over an anchor point. The anchor point will also change into a larger version of itself. See below.
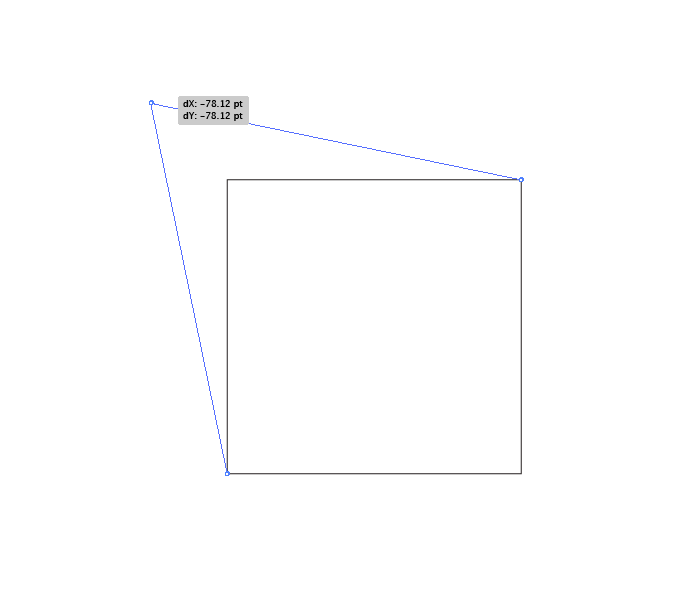
With this method we can manipulate the square by selecting the anchor point and dragging it in any direction.
Selecting Multiple Anchors
You can select multiple anchor points as well, using the same technique. Once you've clicked one anchor point, hold the shift key to select a second one at the same time. With both anchor points selected you can manipulate them simultaneously.
Let's say we want to skew our square. We can either shift-click the top two anchor points or draw a selection around them. Drawing a selection around your anchor points is typically a faster technique.
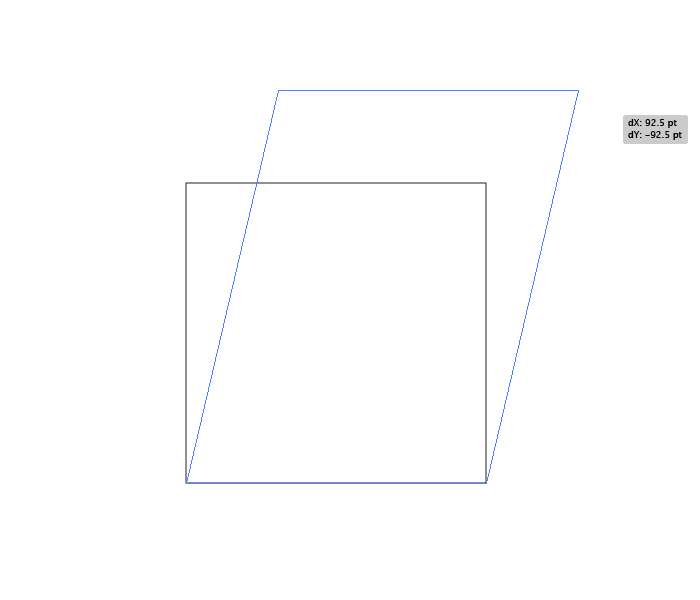
Pro Tip: With any object or anchor point selected you can move it 1px at a time with your keyboard arrow keys or 10px at a time by holding
shift + any arrow key
Bézier Curves
To get a handle on the concept of bézier curves check out these gifs below. Taken from Wikipedia
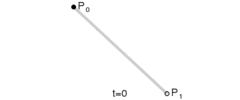

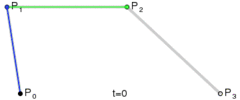
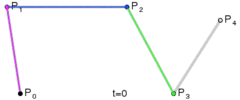
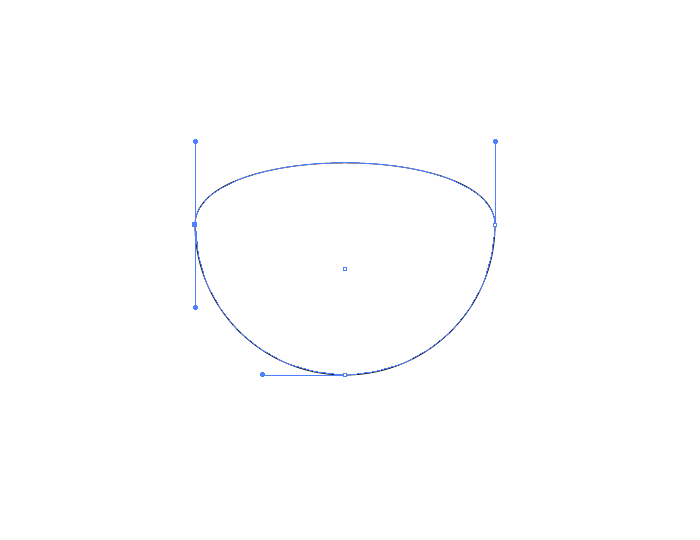
The insanely awesome gifs show what's happening with those handle bars that extend from a vector shapes anchor points. To simply this concept we can examine a circle or ellipse shape.
To select the Ellipse Tool hit the L key on your keyboard. The tool is otherwise hidden behind the Rectangle Tool (M) in the tool panel. Same as before with the square, you can click an drag on the canvas to create a circle shape.
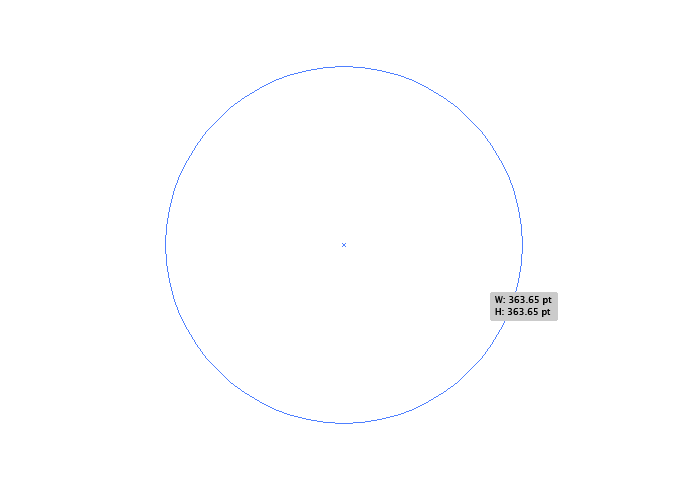
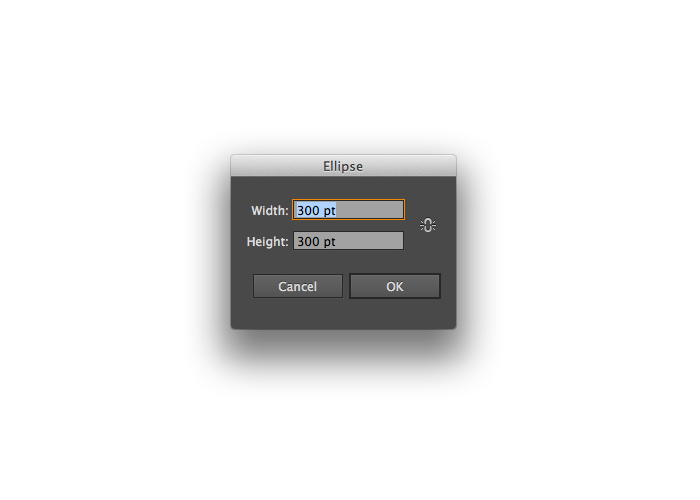
Optionally, you can click once on the canvas to bring up the Ellipse panel to enter in height and width dimensions.
Once you've drawn a circle on the canvas, hit the A key to bring up your Direct Selection tool. Now draw a selection around one or more of the anchor points.
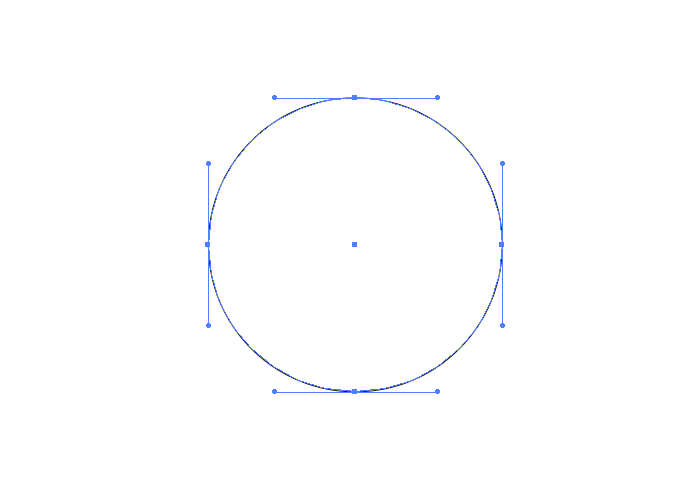
This will show the handlebars extending from the anchor points. Without those handlebars, this circle shape would be a diamond. The length of the handlebar determines the shape of the path.
Now if you want to manipulate the handlebar of the anchor to change the curve of a path, there are two ways to do it. The first is the Direct Selection (A) tool. Use this tool by selecting an anchor point to reveal its handlebars and selecting the handlebar of your choice to move around. This technique will move both handlebars on each side of the anchor, affecting the path equally on both sides as well.

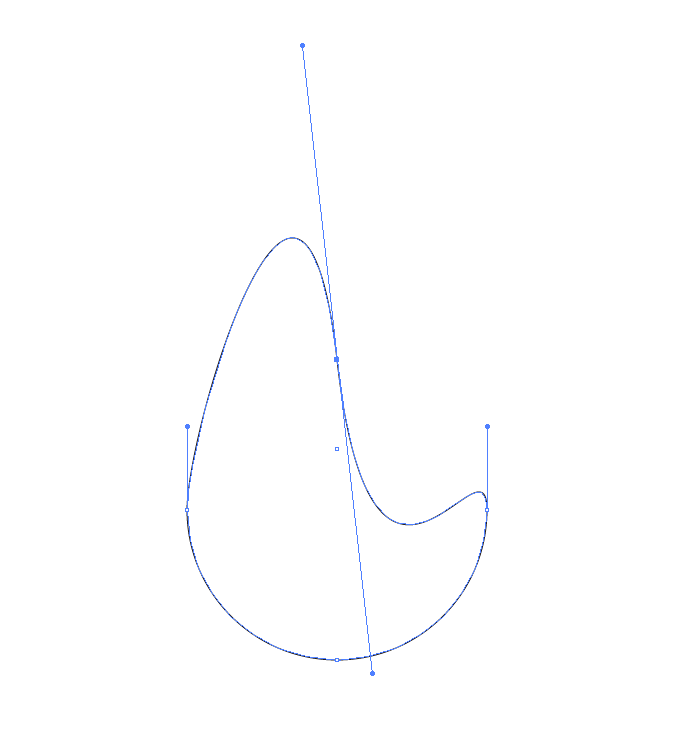
The second way to manipulate an anchor point's handlebar is by using the Pen Tool (P). Using the Direct Selection Tool (A), select one of the anchor points, then select the Pen Tool by hitting P on the keyboard.
If you hover an anchor point with the pen tool selected you will notice a - appear beside the pen tool icon signifying subtraction. Clicking will remove that anchor point and you'll see the path change based on the remaining anchors.
To manipulate the path without removing the anchor point, hold the Option key (while the Pen Tool is selected). This will change the cursor from the pen icon to an angled /\ icon. With this alternative tool you can grab the point on the end of the handlebar and manipulate it in isolation. This will only modify the path on one side of the anchor point, leaving the other side unchanged.
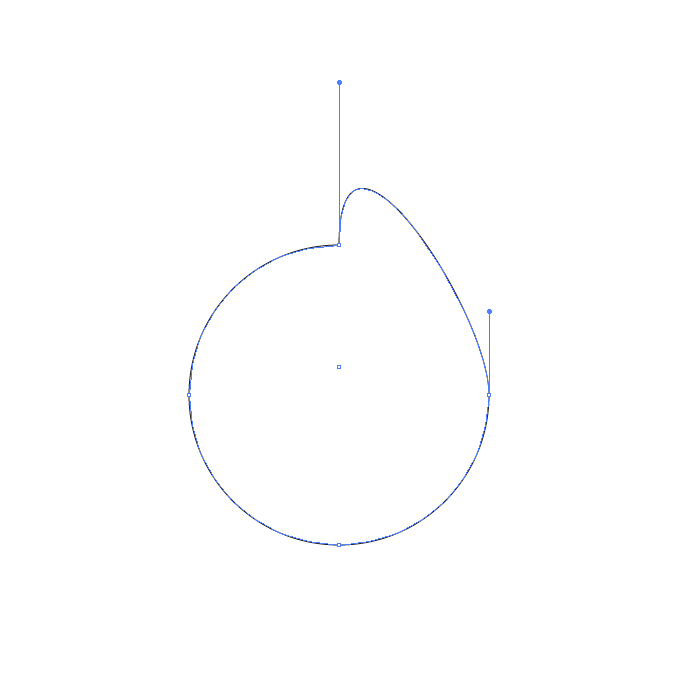
You can also redraw both handlebars of a single anchor point with the alternate /\ tool.
While holding option with the Pen Tool (P) selected, you can click and hold on top of an anchor point and slowly drag in any direction to redraw new handlebars for that point.
Real World Use
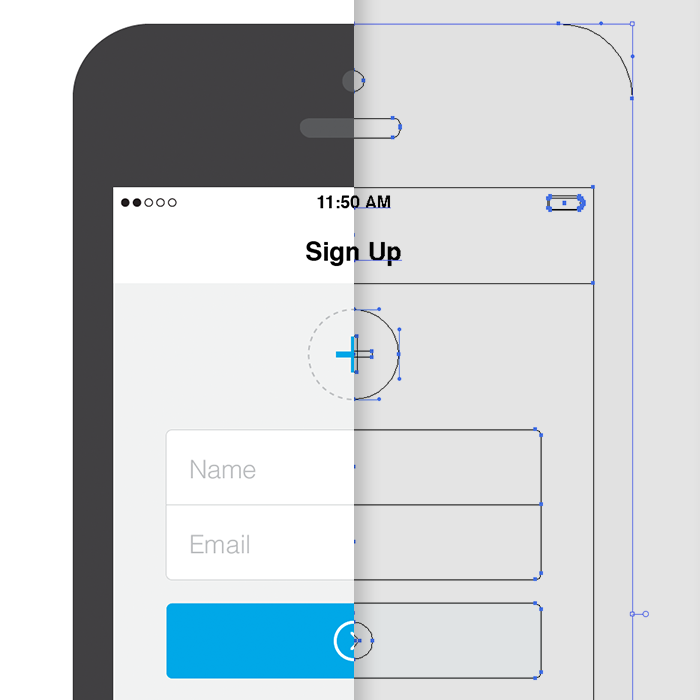
Let's say you want to create a wireframe for an iPhone app's Sign Up screen. Alrighty, let's do that using what you just learned about rectangles, circles and the pen tool.
Here are the steps I performed to create the screen shown in the video above.
- Create a new document by hitting
command+n. - Enter 640x1136 (Screen size for iPhone 5 and greater)
- Select the
Rectangle Tool (M)by hitting the quick key,M. - Click once anywhere on the canvas.
- Enter 640x1136 to create a full size background shape.
- Align the shape with the artboard by clicking and dragging or by using the align tool. (I'll cover this tool in another post.)
- Click once anywhere on the canvas.
- Enter 640x128 (Size of a standard iOS 7 header, including the status bar)
- Manually position the header at the top left of the artboard, or by using the align tool.
- Hit the
Tkey to select theType Tool. - Click anywhere on the canvas and type "Sign Up".
- Command + click anywhere on the canvas away from the text to exit the type input.
- Hit the
Vkey to change to theSelection Tool. - Select the "Sign Up" text and hit
command+shift+Cto center the text. - Drag the "Sign Up" text to the center of the header shape.
- Hit the
Lkey to select theEllipse Tool. - Click anywhere on the canvas. Enter 120x120.
- Hit the
Vkey to select theSelection Tool. - Click and drag the circle just below the header.
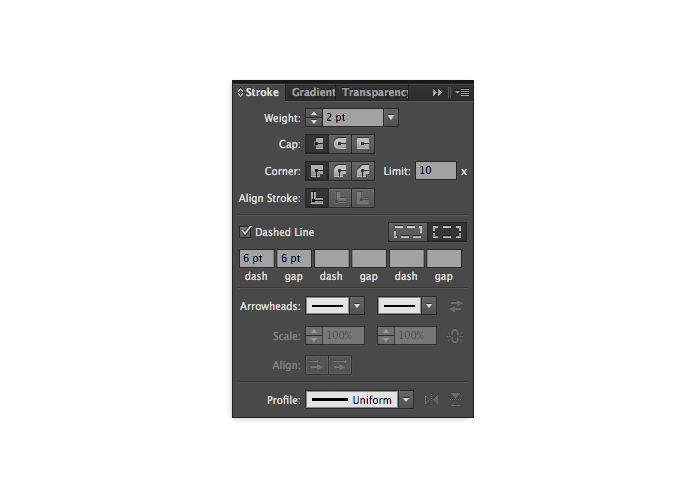
- Adjust the fill to the be transparent and the stroke to have a slightly darker stroke color than the fill. You can give the stroke a dotted line by selecting
Dashed Linein the stroke panel. - Now hit
Mand click anywhere on the canvas. - Enter 8x48 to draw a rectangle.
HitVto change to theSelection Tool.
Select the 8x48 rectangle and hitcommand+cthencommand+shift+vto copy and paste in place. (command+v will paste in the center of your screen) - With the top 8x48 rectangle selected, hover the corner of the bounding box until the cursor changes to the rotate icon.
- Holding shift, rotate the new 8x48 shape 90º.
- Shift+click the vertical 8x48 so both smaller rectangles are selected at the same time.
- Hit
command+gto group these shapes together. (Side note:command+shift+gwhile ungroup objects. - Hit
Vand drag the " + " to the center of your 120x120 circle. - With the " + " selected, shift+click the circle and hit
command+gto group these items. - Hit the
Mkey for theRectangle Tool. - Click anywhere on the canvas. Enter 500x100.
- Hit the
Tkey for theType Tool. Click anywhere and type "Name" - Hit
command+returnto exit type input mode orcommand+clickanywhere on the canvas. - Hit
Vfor theSelection Tool. Grab the "Name" type and position it in the 500x100 rectangle as placeholder text. - Select both the 500x100 rectangle and the type and hit
command+gto group those objects. - With the new group selected. Click and
option+dragthe group below the original input field, holding the shift key to maintain a 90º axis. When youoption+dragit creates a copy of the selected object. - Double click on the copied "Name" to enter the text field. Type "Email"
- Hit
Mfor theRectangle Tooland click anywhere on the canvas. Enter 500x100. - This will be a button, so make it blue (for now). To do this hit
V, select the button. Now make sure the fill swatch is in the foreground above the stroke swatch. Go to your color palette and choose blue.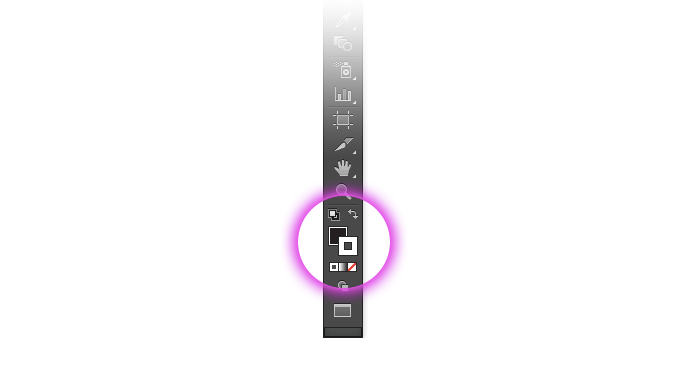
- Position the button just below the "Email` input field.
- Hit
M, click on the canvas and enter 15x15. - Hit
Ato select theDirect Selection Tool. Click one of the anchor points on the small square and hitDelete. Now you have an equilateral triangle instead of a square. - Hit
Vand select the triangle, if it's not already selected. - Position the triangle in the center of the blue button.
- Hover near one of the corners until you see
Selection Toolarrow change into the small rotate icon. - Hold shift to maintain angle constraints and rotate 45º.
- With the rotated triangle selected, choose a transparent fill color (the white swatch with the red slash).
- Now select the stroke selection in the
tool panelto bring stroke to the foreground above the fill. - Choose white as the stroke color.
- From the stroke panel, choose 2px.
In the same stroke panel, choose rounded caps and rounded corners.
Hit
Lfor theEllipse Tool, click anywhere, enter 50x50.- With the small circle selected, hit
Ito select theEyedropper Tool. - Click the small arrow with the eyedropper, while the circle is selected. This will give the circle the same fill and stroke properties and the arrow.
- Hit
Vto select the arrow and circle, now position them in the center of the blue button. - Hit
Mfor theRectangle Tool, click anywhere, and enter 640x432. This is the size of an iOS keyboard. - Position this keyboard shape in the bottom left of the canvas. This serves as reference for how your interface is positioned with the keyboard showing.
- Now hit
LforEllipse Tool, click on the canvas, and enter 11x11. This is the size of the dot, which indicate phone signal strength. - Hit
V, click the dot and give it a black fill with a transparent stroke. - Move the dot to the top left of the canvas.
- With the dot selected,
option+draga copy of the dot just to the right of the original. - Before hitting any other key or clicking anything else, hit
command+dto duplicate your previous action. This short cut key is the jam. - Now you have three dots. Hit
command+dtwice more to give yourself a full five signal dots. - We're in a weak service area so let's select the last three dots and, in the tool panel, reverse the fill and stroke.
- With the same stroked dots selected, change the stroke alignment to the center selection:
Align stroke to inside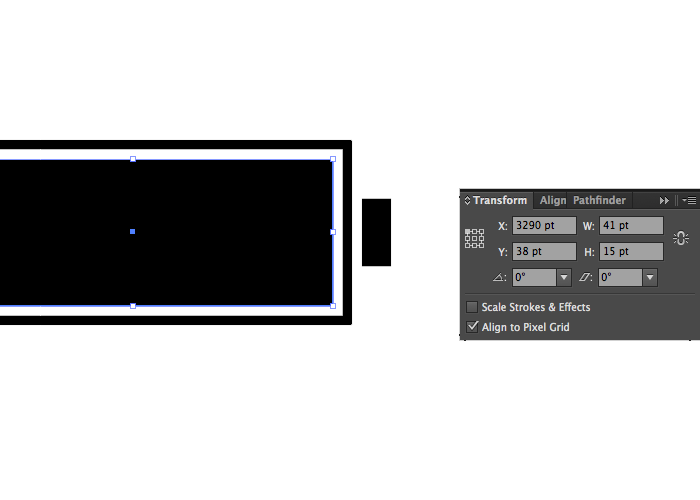
- Now hit
Tfor theType Tool, click near the top and type 11:50 AM. - In the character panel (
Window > Character Panel) orcommand+T, change the font size to 23px. - Hit
Vand align the correct position at the top of the screen. - Last but not least, let's draw the battery shape. Hit
Mfor theRectangle Tool, click anywhere and enter 45x19. - Now change the shape from a black fill to a black stroke by reversing the fill and stroke in the bottom of the tool panel.
- Choose
Align stroke to insidefrom the stroke panel. - Hit
Magain, click, and enter 41X15. Choose a black fill and no stroke for this shape. - Hit
V, select the smaller shape and position in centered within the batter outline. - If you're using Adobe Illustrator CC Version 17.1.0, you have the option to add rounded corners to your rectangle shapes, otherwise leave them square and I'll cover rounded corners in another tutorial.
- Click or select your battery outline anchor points with the
Direct Selection Tool (A)and enter 3px in the corner input at the top of the screen.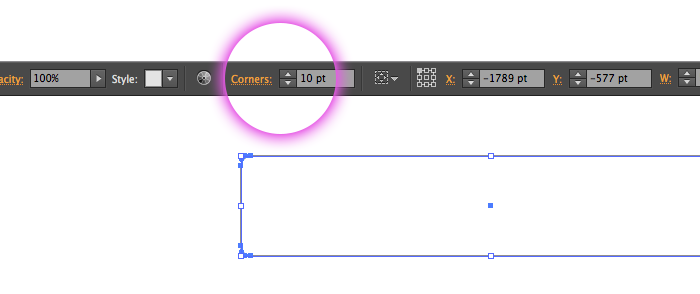
- Now click the battery fill shape with the
Direct Selection Tool (A)and enter 1.5px in the corner input. - Hit
M, click anywhere, enter 3x7 for the battery cap shape. - Hit
AforDirect Selectionand select the two outermost anchor points on the opposite side of the battery. - With these anchors selected only, enter 2px in the corner input.
- Hit
V, select all of the battery pieces, and hitcommand+gto group the objects. - Position the battery group in the top left of the screen and you're done!

If you want to check out the Illustrator file, download it here.
Summary
Vector shapes in Illustrator may seem foreign and complex if you've never dealt with them before, but after a little practice you'll have the basics down in no time. Stick with rectangles and circles for a while as you think about creating basic interface bits. Force yourself to use the quick keys until you know them without thinking about it. You are essentially building muscle memory the same way you'd learn to type or play the guitar.
Continue ramping up your knowledge of Illustrator and learn tips and tricks to get super fast from both a thinking and design perspective in my new AIUX series.